兼容性说明
目前,.NET Core Agent支持的操作系统,.NET Core版本,IIS,数据库等说明如下:
类型 | 支持说明 |
系统 | Windows Server 2008及以上版本,仅64位 |
.NET Core | 2.0及以上版本 |
IIS | 8.0及以上版本 |
数据库(SQL Server) | 驱动版本:NETCore2.0及以上版本 |
NoSQL(Redis) | 驱动版本:所有StackExchange.Redis版本 |
安装.NET Core Agent
要监控.NET Core应用,在透视宝平台的![]() >Server服务页面中选择.NET Core语言,按照页面中的引导安装.NET Core Agent,详细说明如下。
>Server服务页面中选择.NET Core语言,按照页面中的引导安装.NET Core Agent,详细说明如下。
1、解压安装包
2、启动.NET Core Agent:KESTREL方式部署/ IIS方式部署
1、在终端中设置.NetCoreAgent环境变量
2、启动事例
1、编写Dockerfile
2、容器启动时注入DotnetCore
注意:.NET Core Agent只支持Windows 64 bit操作系统。
获取授权编号
授权编号是透视宝用户身份识别的License Key,每个用户对应一个唯一的授权编号,在后续配置中需要使用。
下载.NET Core Agent安装包
点击<下载.NET Core Agent(版本)>按钮,下载最新版本的.NET Core Agent安装包。
在Windows下安装.NET Core Agent
步骤一:解压缩安装包。
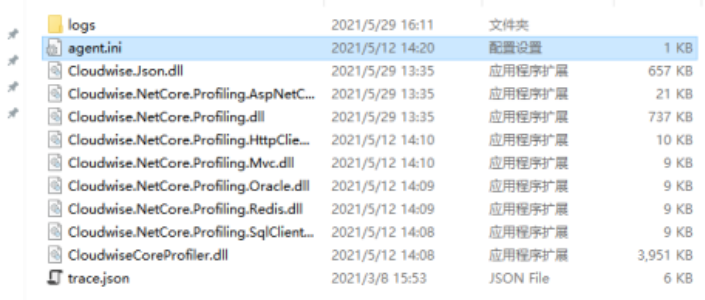
探针目录结构如下。

在agent.ini文件填写SendDomain,ConfigDomain,License,AppName。
步骤二:启动.NET Core Agent
Ø KESTREL方式部署
1. 打开 run.bat 文件,复制如下命令行:
set CORECLR_PROFILER={261197af-4f76-424f-b2ba-98ac168e7674}
set CORECLR_ENABLE_PROFILING=1
set CORECLR_PROFILER_HOME=D:\DotnetCoreAgent
set CORECLR_PROFILER_PATH=D:\DotnetCoreAgent\CloudwiseCoreProfiler.dll
CORECLR_PROFILER_PATH: 需要替换真实Agent路径
CORECLR_PROFILER_HOME: 需要替换真实Agent路径
2. 打开【CMD命令行窗口】进入【应用根目录】中,执行上述命令后启动项目。


3. 在【Powershell】中使用如下命令设置上述环境变量。
$env:
Ø IIS方式部署
1. 在【应用根目录】下的web.config文件中aspnetcore节点处添加环境变量。
注意:将<aspnetcore prccessPath=”dotnet”…/>最后的”/”删除。
<aspnetcore processPath=“dotnet” ....>
            <environmentVariables>
                      <environmentVariable name="CORECLR_PROFILER" value="{261197af-4f76-424f-b2ba-98ac168e7674}" />
                      <environmentVariable name="CORECLR_ENABLE_PROFILING" value="1" />
                      <environmentVariable name="CORECLR_PROFILER_PATH" value="D:\DotnetCoreAgent\CloudwiseCoreProfiler.dll" />
                      <environmentVariable name="CORECLR_PROFILER_HOME" value="D:\DotnetCoreAgent" />
             </environmentVariables>
</aspnetcore>
n CORECLR_PROFILER_PATH :需要替换真实agent路径
n CORECLR_PROFILER_HOME:需要替换真实agent路径

配置完成后重启应用即可。
在Linux下安装.NET Core Agent
将.NetCoreAgent复制到环境中。
步骤一:在终端中设置.NetCoreAgent环境变量
export CORECLR_PROFILER="{261197af-4f76-424f-b2ba-98ac168e7674}"
export CORECLR_ENABLE_PROFILING="1"
export CORECLR_PROFILER_HOME="/root/app/DotnetCoreAgent"
export CORECLR_PROFILER_PATH="/root/app/DotnetCoreAgent/CloudwiseCoreProfiler.so"
步骤二:启动事例
在终端启动应用即可。
在Docker下安装.NET Core Agent
将.NetCoreAgent复制到宿主机环境中。
步骤一:编写Dockerfile
1. Dockerfile如下。
From mcr.microsoft.com/dotnet/sdk:3.1 AS build
WORKDIR /app
RUN mkdir DotnetCoreAgent
COPY /yourdotnetcoreagentdir/ DotnetCoreAgent/
FROM base AS final
ENV CORECLR_PROFILER {261197af-4f76-424f-b2ba-98ac168e7674}
ENV CORECLR_ENABLE_PROFILING 1
ENV CORECLR_PROFILER_HOME /app/DotnetCoreAgent
ENV CORECLR_PROFILER_PATH /app/DotnetCoreAgent/CloudwiseCoreProfiler.so
RUN dotnet new mvc -n mvcApp >/dev/null 2>&1
RUN dotnet build
RUN dotnet publish mvcApp/mvcApp.csproj -o /publish
ENTRYPOINT  ["dotnet","publish/mvcApp.dll","--urls", "http://0.0.0.0:8080"]
2. 打包镜像
docker build -t netcoreagent/demo:1.0 -f DockerfilePath
3. 启动镜像
docker run -it -p 8080:8080 netcoreagent/demo:1.0 /bin/bash
4. 访问
curl http://localhost:8080
步骤二:容器启动时注入DotnetCore
docker run -v DotnetCore探针宿主机目录:(/app/DotNetCoreAgent)容器内目录 -e CORECLR_PROFILER={261197af-4f76-424f-b2ba-98ac168e7674} -e CORECLR_ENABLE_PROFILING =1 -e CORECLR_PROFILER_HOME= /app/DotnetCoreAgent -e CORECLR_PROFILER_PATH=/app /DotNetCoreAgent/CloudwiseCoreProfiler.so注意:以上是事例文档,可根据实际路径做相应的调整:
CORECLR_PROFILER_PATH :需要替换真实agent路径。
CORECLR_PROFILER_HOME:需要替换真实agent路径。
说明:停止探针将【CORECLR_ENABLE_PROFILING】设置为0即可。
卸载.NET Core Agent
执行如下命令后,重启应用:
SET CORECLR_ENABLE_PROFILING=0
